
[LaTeX] Tables(1)
- 설명하기 앞서 table을 그려주는 사이트가 있으니 참고하자. Tables Generator
1. 기본 구조
\begin{tabular}{|c|c|c|}
    \hline
    col1 & col2 & col3\\
    row1 & row1 & row1\\
    row2 & row2 & row2\\
    \hline
    \end{tabular}
\begin{table}[position]
    \centering
    \begin{tabular}{|c|c|c|}
    \hline
    col1 & col2 & col3\\
    row1 & row1 & row1\\
    row2 & row2 & row2\\
    \hline
    \end{tabular}
    \caption{description}       % caption
    \label{tab:tab1}            % reference
\end{table}
2. Position
- 기본: h(here) / t(top) / b(bottom) / p(page) / !(auto)
ex) htp : 삽입한 곳에 표를 삽입하되, 공간이 부족하면 page의 위쪽에 나타내어라. \usepackage{float}: H(exact location)
ex) 반드시 작성한 그 위치에 표를 배치한다.
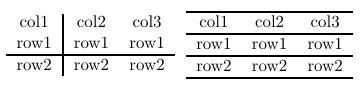
3. Line
1) vertical/horizontal line
- vertical line은
\begin{tabular}옆에|로 표현한다. - horizontal line은
\hline,\cline{}으로 표현하는데
\cline{1-2}은 부분으로 line을 그려주는데, 앞의 예시로 보면 1열과 2열까지만 horizontal line을 그린다는 의미이다. ||,\hline\hline과 같이 중복으로 사용할 수 있다.
\begin{table}[H]
	\centering
	\begin{tabular}{||c|c|c||}
	col1 & col2 & col3\\
	row1 & row1 & row1\\
	row2 & row2 & row2\\
	\end{tabular}\hspace{2ex}
	\begin{tabular}{ccc}
	\hline\hline
	col1 & col2 & col3\\ \hline
	row1 & row1 & row1\\ \hline
	row2 & row2 & row2\\
	\hline\hline
	\end{tabular}\hspace{2ex}
	\begin{tabular}{ccc}
	\cline{1-1}
	col1 & col2 & col3\\ \cline{1-2}
	row1 & row1 & row1\\ \cline{2-3}
	row2 & row2 & row2\\
	\cline{3-3}
	\end{tabular}
\end{table}

2) Line thickness
| line | command |
|---|---|
| verical line | !{vrule width 길이} |
| horizontal line | \noalign{\hrule height 길이} |
| horizontal line | \renewcommand{arrayrulewidth}{길이}, 전체 horizontal line에 적용한다. |
\begin{table}[H]
	\centering
	\begin{tabular}{c!{\vrule width 1pt}cc}
	col1 & col2 & col3\\
	row1 & row1 & row1\\ \noalign{\hrule height 1pt}
	row2 & row2 & row2\\
	\end{tabular}
	\renewcommand{\arrayrulewidth}{1pt}
	\begin{tabular}{ccc}
	\hline
	col1 & col2 & col3\\ \hline
	row1 & row1 & row1\\ \hline
	row2 & row2 & row2\\ \hline
	\end{tabular}
\end{table}
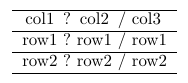
3) columns separator
@{}: line 대신에 column과 column 사이에 구분하는 문자를 설정할 수 있다.
\begin{table}[H]
	\centering
	\begin{tabular}{c@{ ? }c@{ / }l}
	\hline
	col1 & col2 & col3\\ \hline
	row1 & row1 & row1\\ \hline
	row2 & row2 & row2\\ \hline
	\end{tabular}
\end{table}
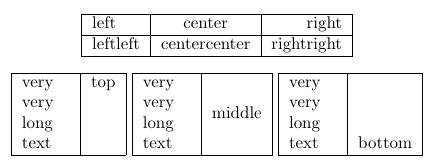
4. Align
- vertical : l(왼쪽) / c(가운데) / r(오른쪽)
column의 개수가 너무 많을 경우에는*{num}{column type}으로 작성할 수 있다. - horizontal : p{길이} / m{길이} / b{길이}
길이를 지정하기 위해서는\usepackage{array}가 필요하다.
\begin{table}[H]
	\centering
	\begin{tabular}{|l|c|r|}
	\hline
	left 	 & center 		& right\\ \hline
	leftleft & centercenter & rightright\\
	\hline
	\end{tabular}\vspace{2ex}

	\begin{tabular}{|p{1cm}|c|c|c|}
	\hline
	very very long text & top \\
	\hline
	\end{tabular}
	\begin{tabular}{|m{1cm}|c|c|c|}
	\hline
	very very long text & middle \\
	\hline
	\end{tabular}
	\begin{tabular}{|b{1cm}|c|c|c|}
	\hline
	very very long text & bottom \\
	\hline
	\end{tabular}
\end{table}
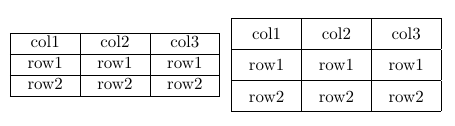
5. Spaces
| line | command |
|---|---|
| verical space | \setlength{\tabcolsep}{길이} |
| horizontal space | \renewcommand{\arraystretch}{숫자}, default=1 |
\begin{table}[H]
	\centering
	\setlength{\tabcolsep}{10pt}
	\begin{tabular}{|c|c|c|}
	\hline
	col1 & col2 & col3\\ \hline
	row1 & row1 & row1\\ \hline
	row2 & row2 & row2\\ \hline
	\end{tabular}
	\renewcommand{\arraystretch}{1.5}
	\begin{tabular}{|c|c|c|}
	\hline
	col1 & col2 & col3\\ \hline
	row1 & row1 & row1\\ \hline
	row2 & row2 & row2\\ \hline
	\end{tabular}
\end{table}
5. Format
>{\command}: column에 대한 font color, size, align 등을 설정할 수 있다.- Format을 쓸 경우 마지막 열의 format에는 반드시
arraybackslashcommand가 필요하다.
\begin{table}[H]
	\centering
	\begin{tabular}{|>{\bfseries}p{2cm}
		        |>{\ttfamily}p{2cm}
		        |>{\scriptsize\itshape\arraybackslash}p{2cm}|}
	\hline
	col1 & col2 & col3\\ \hline
	row1 & row1 & row1\\ \hline
	row2 & row2 & row2\\ \hline
	\end{tabular}
	\begin{tabular}{|>{\raggedright}p{2cm}
			|>{\centering}p{2cm}
			|>{\raggedleft\arraybackslash}p{2cm}|}
	\hline
	col1 & col2 & col3\\ \hline
	row1 & row1 & row1\\ \hline
	row2 & row2 & row2\\ \hline
	\end{tabular}
\end{table}

Reference
- Overleaf, link: https://es.overleaf.com/learn/latex/Tables
- LaTeX/Tables, link: https://en.wikibooks.org/wiki/LaTeX/Tables


댓글남기기